Rimwall Summit - Spray Lakes Canmore

Photo from the Spray Lakes Road

Parking on the Spray Lake side of the
road

Start of the Wind Pass trail across
from the parking spot

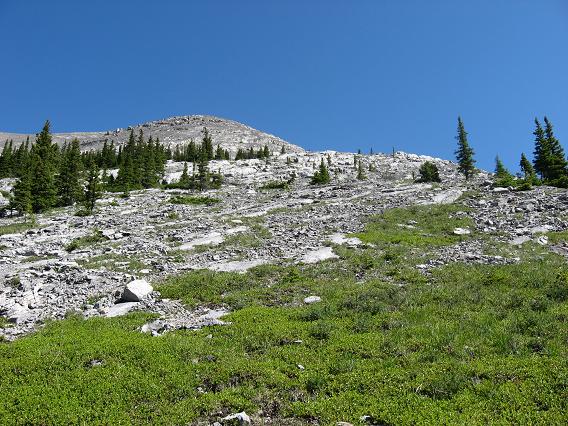
Just near tree line and close to Wind
Pass an opening to your left

Climb through the opening from the
trail and you see the rock benches and the downward traverse to your left. I
went through the first high band to the upper right of the photo while my
two friends found a way through lower down through the trees. They like more
of a challenge than me.

Here is where I accessed the main
slope, again my friends accessed it a bit higher but they like climbing more
than me. I most always seek the easiest way.
Once on the main slope zigzag your way
to the upper ridge, quite steep and you have to pick the best footing to
avoid wasting a lot of energy on the ball bearing scree parts.

Some friends and a look at the
steepness and condition of the slope

Looking back at the main slope to the
upper ridge

Still a bit of a traverse to the
summit block from the main ridge. We ascended the route on the right and
descended the route on the left.

This mountain goat wanted to get
by me on the upper ridge trail but I was too lazy and tired to move so he
took the skyline trail about 10 feet away from me. There is a 3,000 + foot
drop just inches to her left.

Upper ridge trail in yellow, easier
scree descent trail in blue

Wind Tower and Lougheed from the upper
ridge trail

Final few steps to a nice summit!

Allan A. enjoying the views and a
thermos with an iced frappuccino!

View of the Three Sisters from the
summit

Time to head down after spending about
an hour and a half on top

The scree slope down, starts near the
black dirt section on the upper ridge
Rimwall Summit
Scramble: Class 2 – Steep Off-trail Hiking for most of it
Altitude: 2,680m (8,790 ft)
Elevation Gain: 1,020m (3,345 ft)
Ascent Time: 3 – 4 Hours
Best Season to Scramble: Mid-June to September
Highlights
Great views offset a bit by ball bearing scree on slabs
and route finding up and down, wear some gloves for the descent and go back
off the main slope towards Wind Pass and access the Wind Pass trail higher
up rather than bushwhacking down the drainage through the trees.
Getting There
From the Bow River bridge in Canmore it’s around 21+ km
to the parking spot. The road from the Bow River bridge takes you past the
Canmore Nordic Centre and onto the Spray Lakes road (packed gravel). When
you see the signed "Driftwood Day Use Area" continue on for another 1.4 km
to a lakeside grassy pulloff spot. If you pass the sign for Spurling Creek
you have gone too far.
Route Description
From the parking spot you can see the upper slopes of
Rimwall Summit to your left with Wind Tower on your right. Cross the road to
the trailhead on the left bank of the creek which will take you to West Wind
Pass which lies between Wind Tower and Rimwall. Stay left at the first fork
in the trail and then stay right at the next fork. The trail takes you high
above the creek and up to Wind Pass. Right around tree line and only 5-10
minutes from Wind Pass there is an opening to your left (about 45-60minutes
to this point) which allows you to see the main slope of Rimwall. Climb into
this clearing and you are greeted with a number of rock benches which you
have to navigate through to access the main ascent slope. The best spot per
the photos is by traversing down slope losing a bit of altitude to reach an
easier spot to ascend onto the main slope. There are a couple of fairly high
rock benches (10-20 feet high) that you have to scope out to climb through
in the best spot. Route finding required here. Be careful to pick the
easiest spot along the walls. Once you have accessed the main slope you must
zigzag your way straight up looking for the best footing through the loose
scree on slabs. Once you reach the top of the main slope the summit block
comes into view to your left. Follow the high trail over to the summit block
and choose the higher or lower line through the rock bands to access the
short summit slope and voila you are on top.
As you cross to the summit block note the drainage below
you. There is a good scree trail near the black patch of dirt which takes
you easily and rapidly down moving back towards the main slope you came up
on your far left. You will see at the bottom left of the drainage a fairly
large cairn heading into the trees but I do not recommend continuing down
into the trees. This is due to the long descent through the trees before you
can even access the Wind Pass trail again, too many steep rock bands between
you and the this trail. We followed the tree route down but almost
paralleled the whole Wind Pass trail before we could descend down to it.
Instead I would recommend remembering or marking with a
cairn the spot where you accessed the main ridge, descend here and traverse
back upwards towards Wind Pass and gain the Wind Pass trail where you left
it on your ascent. This might involve perhaps 150ft of elevation gain but it
sure is more enjoyable to descend on a good trail back to the road than
loose footing going through the trees almost the whole way.
